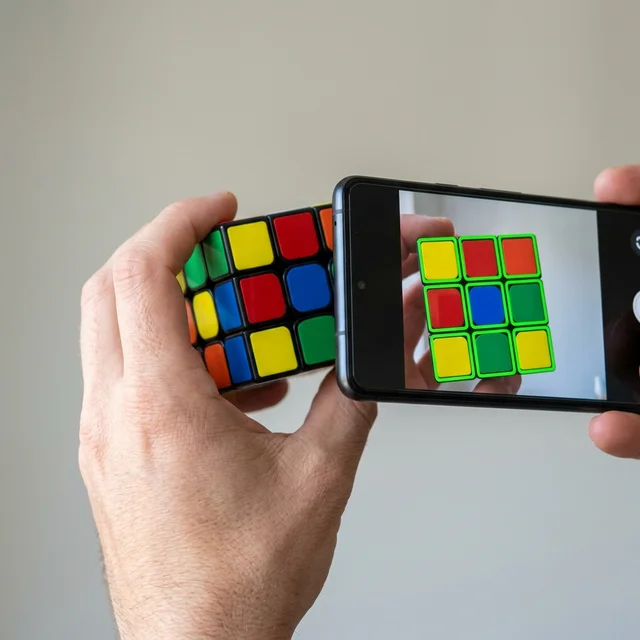
You’ve been there. You download a scanner app, point your phone at the cube, and the colors come back completely wrong. Red becomes orange. White becomes yellow. You spend five minutes tapping tiny squares to correct it manually, give up, and close the app.
The good news: this is not your fault, and it is not your phone. It is a fundamental flaw in how most scanning apps are built.
Here is why it keeps happening — and how a geometry-first scanner works differently.
Why Almost Every Scanner App Gets the Colors Wrong
Most Rubik’s Cube scanner apps work the same way: they point the camera at one face, take a snapshot, and then try to figure out the color of each tile by analyzing the pixels.
This sounds reasonable. The problem is that a pixel’s color is not a fixed property — it is a measurement of reflected light. And light changes everything.
Under a warm incandescent bulb, your white tiles look yellow. Your yellow tiles look orange. Your orange tiles look red. The app’s color classifier was trained in a lab under controlled lighting, and your kitchen looks nothing like that lab.
This is why apps consistently confuse orange and red, and white and yellow — those pairs fall into what computer vision researchers call “danger zones,” where the color signal collapses under real-world lighting conditions.
Scanning one face at a time makes the problem worse. Every time you rotate the cube to capture the next face, the lighting angle shifts, the white balance recalibrates, and the app is essentially starting from scratch with a new color baseline.
A Different Approach: Find the Geometry First
Instead of asking “what color is this pixel?”, a geometry-first scanner asks a different question: “where is the cube?”
Using real-time edge detection, the scanner identifies the physical structure of the cube — the grid lines between tiles, the corners of each face, the 3×3 pattern of stickers — before it looks at any colors at all.
By isolating each tile region first, the scanner samples color from the center of each sticker — the most stable, least shadow-affected part. This filters out the glare at tile edges, the shadow at corners, and reflections from the tile surface.
The result: the scanner does not need perfect lighting. It needs enough lighting to see the cube’s edges. That is a much easier bar to clear.
The Continuous Rotation Flow: Why You Do Not Stop and Tap
Most apps make you capture each face separately: align, tap, confirm, rotate, repeat — six times. By the time you finish the sixth face, the ambient light has shifted twice and the app has accumulated errors across every capture.
CubeUnstuck’s scanner works differently. You rotate the cube continuously while the camera watches. When the geometry detection sees a valid face alignment — all 9 tiles visible, the grid locked — it captures that face automatically and immediately signals you to rotate to the next one.
The full scan of all six faces happens in a single uninterrupted motion. In good light with a standard cube, the entire side scan completes in 2 to 3 seconds.
The Starting Position — and Why It Matters
The scanner requires one specific starting position: white center face pointing up, green center face pointing toward you.
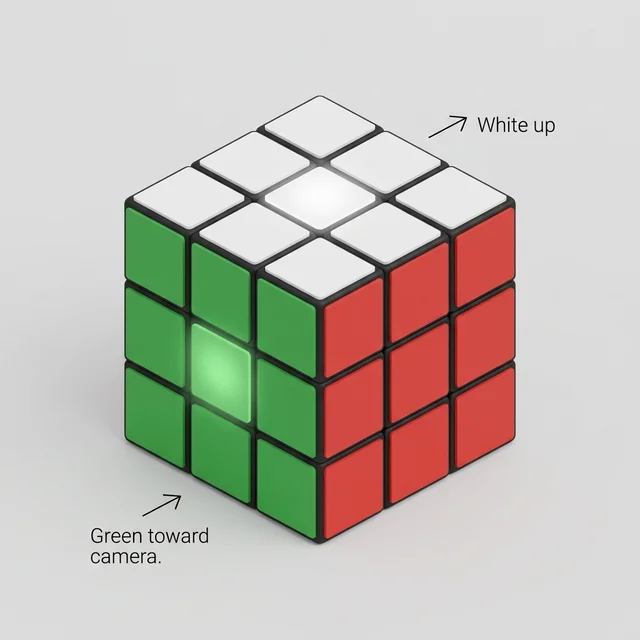 White center up, green center toward the camera. Follow the on-screen arrows from here and every other face is captured automatically.
This is not an arbitrary constraint. Starting from a known orientation means the scanner always knows which face it is looking at, without having to solve an additional recognition problem. It lets the app tell you exactly which direction to rotate next — rather than asking you to figure that out yourself.
The 15-second demo video next to the scan button shows this orientation clearly. Watching it once before your first scan will save you time.
What Good Scanning Conditions Look Like
The scanner is not fragile, but a few conditions make a genuine difference.
Lighting: Bright and even is best. A well-lit room or natural light from a window works well. A single overhead bulb directly above the cube can cast shadows between tiles, but the scanner will usually still lock on — it just takes a fraction of a second longer.
Distance: Hold the cube at a comfortable reading distance from the phone — roughly 15 to 25 centimeters. Too close and the full 3×3 grid may not fit in frame. Too far and the edge lines become too fine to detect reliably.
Angle: Hold the cube squarely toward the camera. A slight tilt is fine — the geometry detection handles perspective — but extreme angles reduce the visible tile area.
The Two Conditions That Will Prevent Scanning
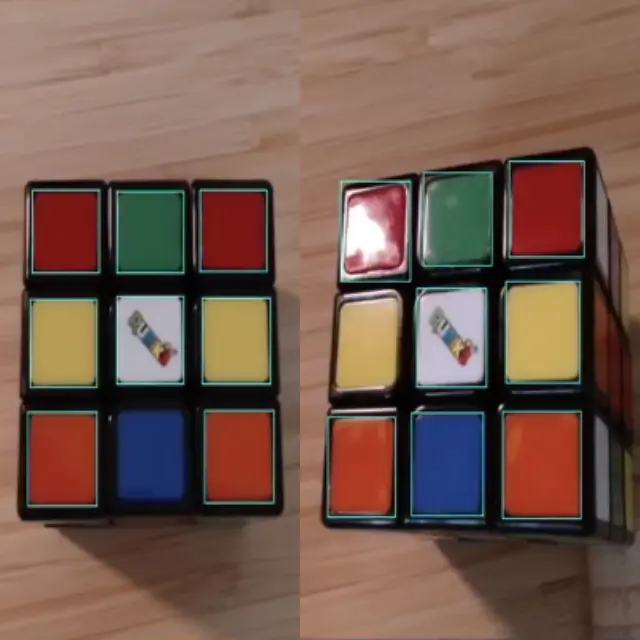 Left: too dark — the green frame does not appear, which is correct behavior rather than a wrong answer. Right: direct lamp glare on one tile. Rotating the cube slightly removes it.
Very low light: If the room is dark enough that the cube’s tile edges are not clearly visible, the edge detector cannot find the geometry and the green frame will not appear. Move to a brighter spot. The scanner is designed to give you no answer rather than a wrong one — no frame is honest feedback, not a broken app.
Direct glare on a tile: If a light source reflects off one or more tiles as a bright white spot, it can wash out that area and prevent the frame from locking. Rotating the cube slightly — even 10 or 15 degrees — usually eliminates the reflection without losing face alignment.
What to Do If One Tile Scans Wrong
Even with a good scanner, an occasional tile can land on the wrong color — usually an orange read as red, or white read as yellow, under mixed lighting.
After the scan completes, the app shows you the full digital twin of your cube before calculating the solution. If any tile looks wrong, you can tap it and correct the color manually before proceeding. This takes about five seconds. Think of it as a spell-checker for your cube state, not a sign that the scan failed.
Older Devices and Slower Phones
Geometry-based scanning is more computationally intensive than simple color classification. On a five-year-old phone in good light the scanner works normally. On a ten-year-old tablet it will work correctly but may take a moment longer to lock onto each face — the green frame appears slightly slower, and the automatic capture happens a beat after alignment rather than instantly.
If you are on an older device, slow down your rotation between faces slightly. Give the detector half a second after the green frame appears before rotating to the next side.
A 30-Second Guide to Your First Scan
- Find a reasonably bright spot — a lamp-lit room is fine, natural daylight is ideal.
- Hold the cube with the white center facing up and the green center facing toward you.
- Watch the 15-second demo next to the scan button if this is your first time.
- Hold the cube at arm’s length toward the camera.
- Wait for the green frame to appear around all 9 tiles.
- Follow the arrow — rotate to the next face as indicated.
- Repeat for all six faces. Total time in good conditions: one to two seconds.
- Check the digital twin, correct any wrong tiles with a tap, and hit Solve.
No notation, no memorization, no algorithm. Just your cube and a camera.