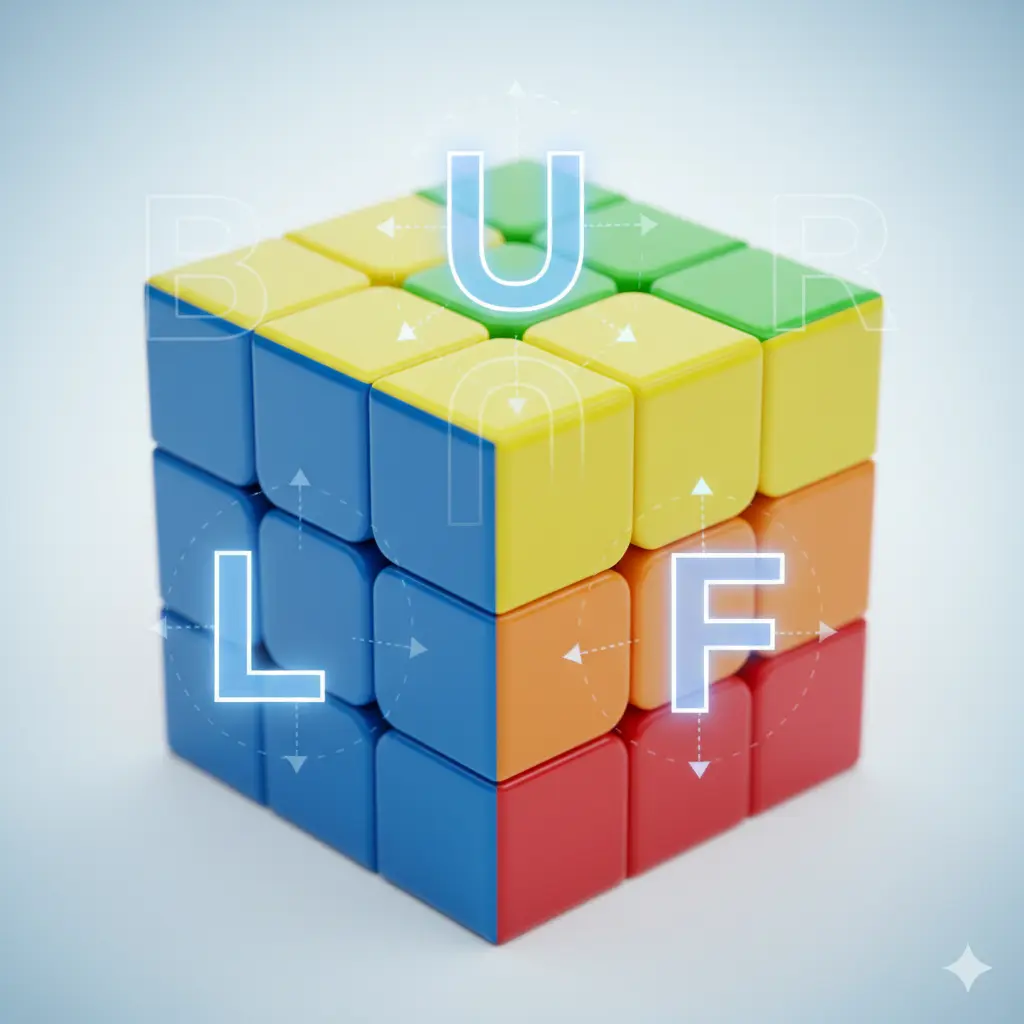
You decide to learn the Rubik’s Cube. You find a tutorial. You are ready. And then, within the first 30 seconds, you see this:
R U R’ U’ F’ U F
No explanation of what it means yet. Just seven characters of something that looks like a password generated by a broken keyboard.
If your first instinct is to close the tab, you are in very large company. Rubik’s Cube notation is one of the biggest reasons beginners quit before they even start solving. Not because the puzzle is too hard. Because the language feels impossible.
Here is the good news: the notation is actually simple once you see the logic. And the even better news: you might not need it at all.
The Six Letters
Every Rubik’s Cube has six faces. Each face gets one letter. That is the entire foundation of the system.
Hold the cube in front of you. Don’t rotate it. Just hold it still and look at it.
- R = Right (the face on your right)
- L = Left (the face on your left)
- U = Up (the face on top)
- D = Down (the face on the bottom)
- F = Front (the face looking at you)
- B = Back (the face you can’t see)
That is it. Six faces, six letters. The letters never change as long as you keep holding the cube the same way.
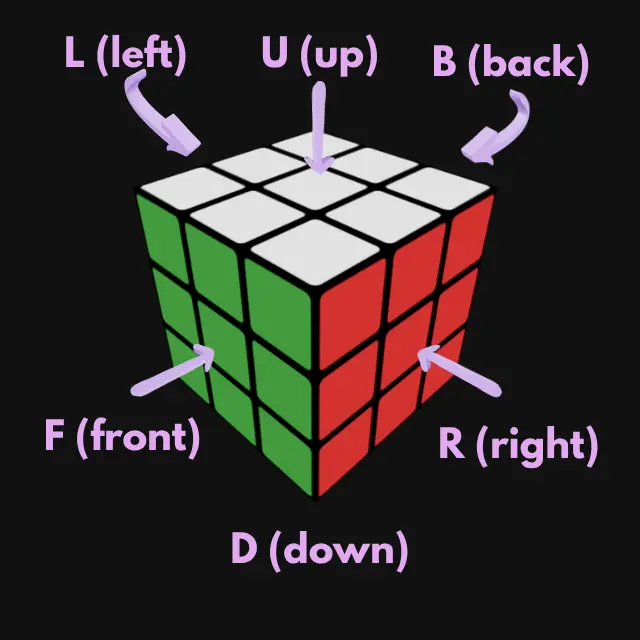 Above: The six faces of a Rubik’s Cube. Each letter simply names a face based on where it is while you hold the cube.
The Three Modifiers
Once you know which face to turn, you need to know how to turn it. There are exactly three options:
| What You See | What It Means | Example |
|---|---|---|
| Just the letter | Turn that face clockwise (90°) | R = turn the right face clockwise |
| Letter + ’ (apostrophe) | Turn that face counterclockwise (90°) | R’ = turn the right face counterclockwise |
| Letter + 2 | Turn that face 180° (half turn) | R2 = turn the right face halfway around |
The apostrophe is called “prime” in cubing circles. So R’ is spoken as “R prime.” But you don’t need to say it out loud to use it. The symbol just means: go the other way.
Where It Gets Confusing (Honestly)
So far, so good. Six letters, three modifiers. Simple system. But here is where almost every beginner runs into trouble.
”Clockwise” depends on where you are looking
When the notation says R (turn the right face clockwise), it means clockwise as if you were staring directly at the right face. Not clockwise from the front. Not clockwise from above. Clockwise from the right side’s perspective.
This means:
- R (right face clockwise) moves the top edge of the right face away from you
- L (left face clockwise) moves the top edge of the left face toward you
Both say “clockwise.” But your hands do the opposite thing. This single concept trips up more beginners than any other part of the Rubik’s Cube.
The same problem applies to U versus D. Both say clockwise. But U rotates the top layer to the right (from your view), while D rotates the bottom layer to the left. Because “clockwise” means something different when you’re looking at the bottom face versus the top face.
The Back face is invisible
The B move (back face) is the most disorienting of all. You can’t see the back face while holding the cube normally. So when a tutorial says “B,” you have to mentally rotate your perspective to figure out which direction is clockwise for a face you can’t even see.
Many beginners either skip tutorials that use B moves or physically flip the cube around, which then breaks the orientation for everything else.
Algorithms look like gibberish
When you combine the letters into sequences, the result is strings like:
R U R’ U R U2 R’ U
To an experienced cuber, this is a familiar pattern (it’s a common Sune algorithm). To a beginner, it is eight disconnected instructions with no visible logic, no explanation of why these moves work, and no indication of what to do if you get lost halfway through.
The notation tells you what to do. It never tells you why. And for many learners, “why” is exactly what they need to stay motivated.
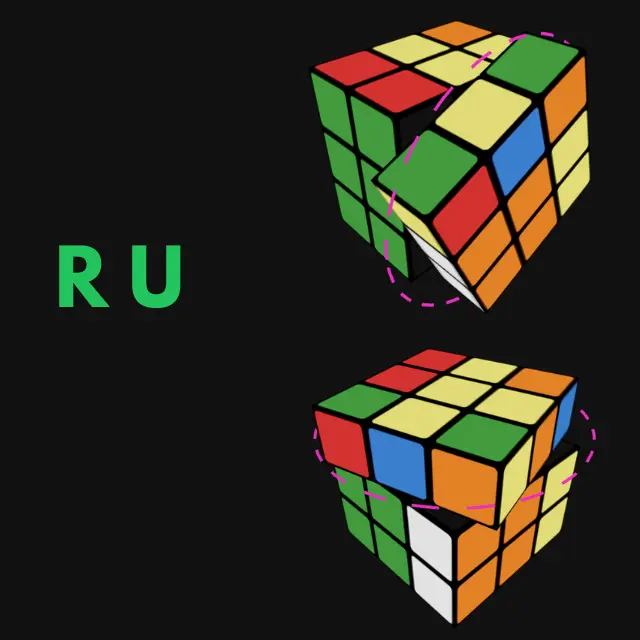 Above: The same move sequence shown in notation (left) and as visual arrows (right). For many beginners, the visual version takes seconds to follow while the notation takes minutes to decode.
A Brief History (Why It Exists)
The notation system was created in the late 1970s by British mathematician David Singmaster. He needed a way to write down cube moves on paper so that solutions could be published and shared in academic journals.
It was never designed for real-time teaching. It was designed for written communication between people who already understood the cube. The fact that beginners are expected to learn it before they can solve their first cube is an accident of history, not a deliberate pedagogical choice.
Understanding this helps explain why it feels so unfriendly. You are not the target audience. The target audience was mathematicians writing letters to each other in 1979.
The Full Cheat Sheet (If You Want It)
If you do decide to learn notation, here is everything a beginner needs on a single reference table:
| Move | Plain English |
|---|---|
| R | Turn the right face — top edge goes away from you |
| R’ | Turn the right face — top edge comes toward you |
| R2 | Turn the right face halfway (180°) |
| L | Turn the left face — top edge comes toward you |
| L’ | Turn the left face — top edge goes away from you |
| L2 | Turn the left face halfway |
| U | Turn the top face — front edge goes to the right |
| U’ | Turn the top face — front edge goes to the left |
| U2 | Turn the top face halfway |
| D | Turn the bottom face — front edge goes to the left |
| D’ | Turn the bottom face — front edge goes to the right |
| D2 | Turn the bottom face halfway |
| F | Turn the front face — top edge goes to the right |
| F’ | Turn the front face — top edge goes to the left |
| F2 | Turn the front face halfway |
| B | Turn the back face — top edge goes to the left |
| B’ | Turn the back face — top edge goes to the right |
| B2 | Turn the back face halfway |
That is the complete beginner notation. Everything else (slice moves, wide turns, cube rotations) is for intermediate and advanced methods. You do not need it for your first solve.
Why You Might Not Need Notation at All
Here is the thing about notation that nobody says out loud: it is a tool for writing down moves, not for learning them.
When you are physically holding a cube, trying to follow a sequence in real time, notation adds a translation step between your eyes and your hands. You read “R,” you think “right face clockwise,” you figure out which direction that is from your current perspective, and then you turn. Every single move has this decode-think-turn cycle.
What if you could skip all of that?
The CubeUnstuck Digital Tutor does exactly this. Instead of showing you letters, it shows you:
-
A curved arrow tracing the path of the piece that is about to move. Before you do anything, you can see where the piece will end up. This is the “why” that notation never provides.
-
A glowing ring around the exact face to turn, rotating in the direction you need to turn it. No decoding. No “which way is clockwise from the right face’s perspective.” The halo spins in the direction your hand should move.
Here is what the difference looks like in practice:
| Notation says | CubeUnstuck shows |
|---|---|
| R U R’ U’ | A green arrow shows the white edge sliding into position, then a halo spins on the right face (upward), then a halo on the top (right), then right face (downward), then top (left) |
| “Memorize this sequence" | "Watch this piece move into place” |
The notation approach requires you to decode four symbols. The visual approach requires you to follow four animations. Same result. Very different experience.
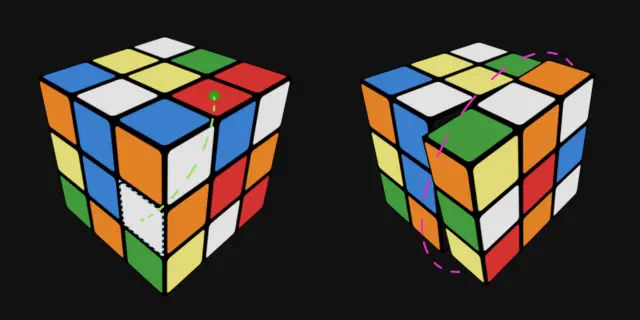 Above: CubeUnstuck replaces notation with a trajectory arrow (green, showing where the piece goes) and a rotation halo (showing which face to turn and in which direction). No letters to decode.
When Notation Does Matter
To be fair, notation is not useless. It is genuinely useful in certain situations:
- Written communication. If you want to share a sequence with someone in text (a forum post, a chat message, a printed guide), notation is the most compact way to do it.
- Algorithm databases. Sites that catalog thousands of algorithms for advanced methods use notation because there is no practical alternative for storing that much data.
- Speed cubing. Once you are solving the cube in under 30 seconds, you think in moves, not in visuals. Notation becomes a natural shorthand for patterns your fingers already know.
But for a beginner solving their first cube? Notation is overhead. It is one more thing to learn on top of an already challenging puzzle. And it is completely optional if you have a tool that replaces it with something your brain processes faster.
Start Without It
If notation has ever been the reason you gave up on the Rubik’s Cube—or the reason you haven’t started—know that you can skip it entirely.
Learn to solve the cube first, using visual guides. Understand what the moves do and why they work. Get comfortable with the physical feeling of turning faces in the right sequence. Then, if you want, go back and learn notation. It will make much more sense once you already know what the moves feel like.
You don’t learn a language by memorizing the grammar first. You learn by speaking. The Rubik’s Cube is the same.